Bridging
|
Setting up this experiment Scripts are used. A set of them is provided for each
experiment. Please see the "Virtual Machine Usage" section of this
document. |
| Note - on taking screenshots
Below there are several junctures where you are asked to take screenshots (notations appear there in bracketed red italics). To do that, it's recommended to use a screenshot program that you may have on your host machine. Take the screenshot with the VM window open showing the activity of interest. Alternatively, the guest virtual machine has a screenshot program. You can take a screenshot within the VM by pressing the PrintScreen key. The result is that a file is deposited on the disk. The name of the file will be something like "Screenshot from 2020-09-14 21-29-57.png" and it will be found in the "Pictures" subdirectory of the user's home directory. In the exercise, performed as student, that will be /home/student/Pictures/. The host option is recommended in order to avoid the need to transfer the file out of the guest VM, since the VMs as provided are not equipped with interfaces that give them internet/external connectivity. It can be done and is documented on our class website but is best avoided. |
Set up
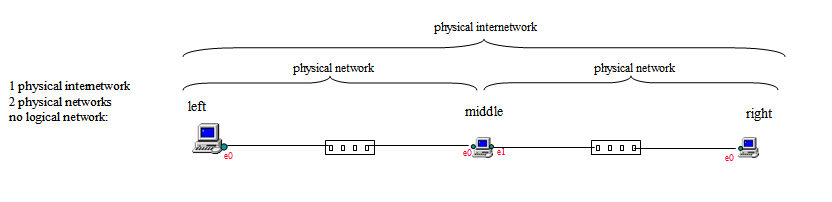
This exercise is performed in this physical setting:
In the exercise it will configure it logically two ways, routed and bridged.
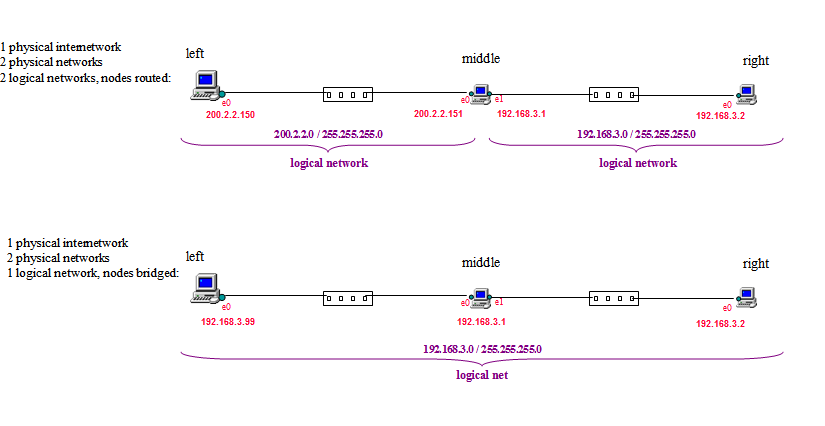
The exercise will come to you with the routed scenario already configured and in place just as shown. Here are the scripts you run to instantiate the exercise.
| Create the machines and set up the exercise using the
scripts provided for that purpose. Run, in order:
vmconfigure-populate.bat (or .sh) vmconfigure-construct-network.bat vmconfigure-guestOS-internal-settings.bat |
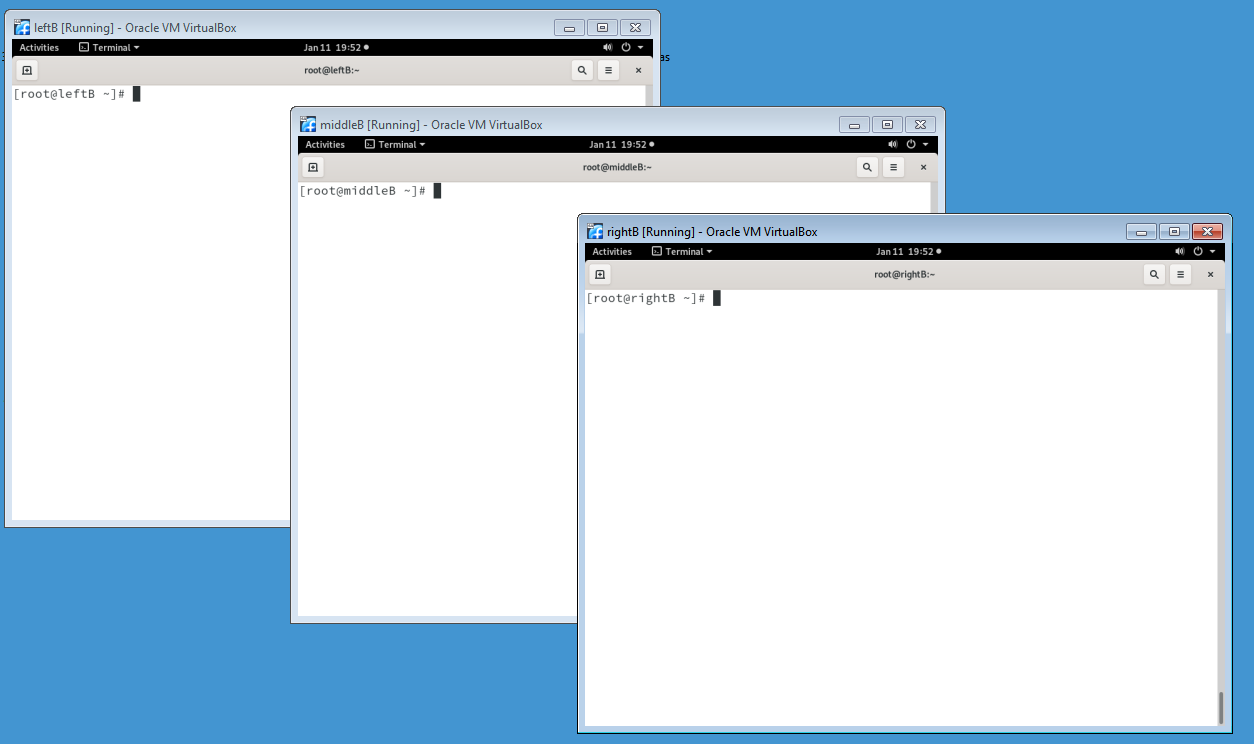
You might arrange your desktop layout something like this:
Routed scenario
Test the current, routed configuration to make sure it is as advertised. In each of the three VMs:
ifconfig
route -n
Study the numbers you see, make sure it makes sense to you and conforms to the diagram above that shows the 2 -ogical-network routed scenario. The test that routing is happening would be to ping end-to-end and watch the traffic flow through the middle:
tcpdump -nnti enp0s8 icmp
( on middleB )
ping -c1 192.168.3.2
( on leftB )
Halt the tcpdump command with ctrl-C keystroke. Now perform a ping going through from left to right (with provoked reply right to left) and capture on the interfaces of both leftB and rightB. Do these commands in order:
tcpdump -ti enp0s3 icmp -w routed.cap &
( on leftB )
tcpdump -ti enp0s3 icmp -w routed.cap &
( on rightB )
ping -c1 192.168.3.2 ( on leftB )
killall tcpdump
( on leftB )
killall tcpdump
( on rightB )
A couple of log files named routed.cap are left behind, one on each machine,
containing what transpired on the interfaces. We want to know whether
or not the received material is identical to the transmitted. Comparing
checksums can tell us. tshark can extract the checksums (tshark is another
character mode sniffer like tcpdump, is part of the wireshark product, and is
sometimes useful for features it offers but tcpdump doesn't). Print checksums:
tshark -r routed.cap -T fields
-e ip.src -e ip.dst -e ip.checksum
( on leftB )
tshark -r routed.cap -T fields -e ip.src
-e ip.dst -e ip.checksum (
on rightB )
Make sure you can see that the checksums of what was sent and received, for both the ping request and the ping reply, are different. That is, what was sent and received are not the same.. middle, when these passed through it, changed them. That is characteristic of routing.
Undoing the routed configuration
Now let's "unconfigure" these machines, removing the IP addresses from their interfaces and evacuating their routing tables. Do the following on both leftB and rightB:
ifconfig enp0s3 0
ifconfig enp0s3 down
ifconfig enp0s3
( to examine the effect, note address has been stripped )
route
-n
( to examine the effect, note routing table is empty )
and on middleB do:
ifconfig enp0s3 0
ifconfig enp0s3 down
ifconfig enp0s8 0
ifconfig enp0s8 down
ifconfig enp0s3
( to examine the effect )
ifconfig enp0s8
( to examine the effect )
route -n
( to examine the effect, )
Try the ping again (leftB to rightB) to verify it doesn't work.
Bridged scenario
Now let's do some bridge building. On the respective machines, execute these
commands:
| on node "leftB" | on node "middleB" | on node "rightB" |
| ifconfig enp0s3 192.168.3.99 | brctl addbr goldengate brctl addif goldengate enp0s3 brctl addif goldengate enp0s8 ifconfig enp0s3 0.0.0.0 promisc up ifconfig enp0s8 0.0.0.0 promisc up ifconfig goldengate 192.168.3.1 |
ifconfig enp0s3 192.168.3.2 |
Now perform a ping going through from left to right (with reply right to left)
and capture on the interfaces of both:
tcpdump -ti enp0s3 icmp -w bridged.cap
& ( on leftB )
tcpdump -ti enp0s3 icmp -w bridged.cap
& ( on rightB )
ping -c1 192.168.3.2 ( on leftB )
killall tcpdump
( on leftB )
killall tcpdump
( on rightB )
A couple of log files named bridged.cap are left behind, one on each machine, containing what transpired on the tcpdump'd interfaces. We want to know whether or not the received material is identical to the transmitted. Comparing checksums can tell us. tshark can extract the checksums (tshark is another character mode sniffer like tcpdump, is part of the wireshark product, and is sometimes useful for features it offers but tcpdump doesn't). Print checksums:
tshark -r bridged.cap -T fields
-e ip.src -e ip.dst -e
ip.checksum (
on leftB )
tshark -r bridged.cap -T fields -e ip.src
-e ip.dst -e ip.checksum (
on rightB )
Make sure you can see that the checksums of what was sent and received, for both the ping request and the ping reply, are the same. That is, what was sent and received is the same. middle, when these passed through it, didn't change them. That is characteristic of bridges, a characteristic it shares with lengths of wire.
What to turn in
Make a screenshot in which both leftB and rightB's screens are visible on your host desktop. In them repeat your previous tshark tests, first on the routed.cap files, then the bridged.cap files, as follows:
clear (
on leftB )
tshark -r routed.cap -T fields -e ip.src
-e ip.dst -e
ip.checksum ( on leftB )
tshark -r bridged.cap -T fields -e ip.src
-e ip.dst -e ip.checksum (
on leftB )
clear (
on rightB )
tshark -r routed.cap -T fields
-e ip.src -e ip.dst -e ip.checksum
( on rightB )
tshark -r bridged.cap -T fields -e ip.src
-e ip.dst -e ip.checksum (
on rightB )
Make a screenshot of that. Name it routing-vs-bridging.jpg (or .png). Mine looks like this.
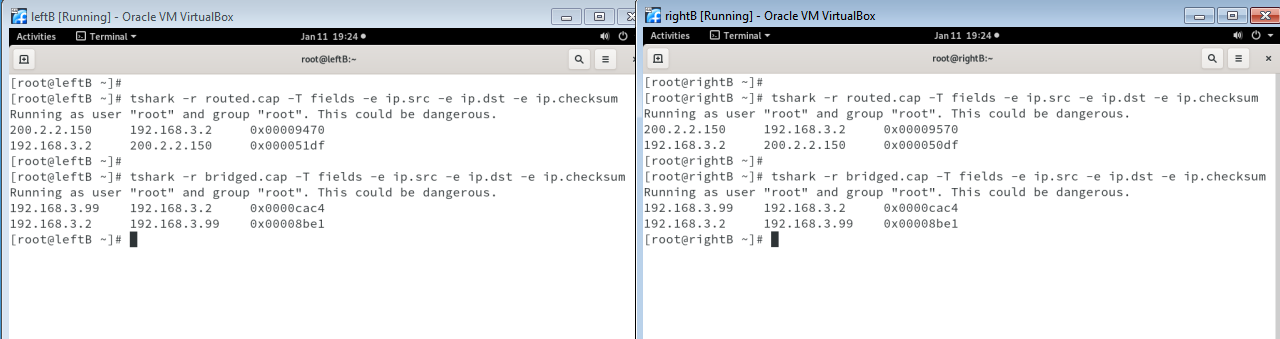