nmap ( "network map") port scanner
The exercise to perform
This exercise involves two machines, physical or virtual. Make sure they::
- are connected in a common local area network
- have IP addresses on the interfaces by which they connect to it
- can ping each other.
You will play these two computers off against each other. One will be mostly passive, the target machine. From the other you will run nmap against that target. While operating, it is instructive to be able to see the network traffic you cause. For that, run Wireshark (or tcpdump) in a window on the side. Fire that up now, size and relocate to a convenient part of the screen, on both machines.
If you are operating with the provided CLIENT and SERVER pair of provided virtual machines, "the first machine" in these instructions refers to CLIENT and "the second machine" or "the target machine" refer to SERVER. In that environment, I logged in to SERVER as root. In CLIENT, after logging in as student I brought up the gui desktop (startx) and then a terminal window in which I became root (sudo).
Color coding convention: commands in blue are to be executed on the first/CLIENT machine, those in red on the second/SERVER machine, those in black on both.
Before doing anything, make sure there are no obstructing firewall rules in place . On both machines:
iptables -F
[
these commands are not needed on provided class virtual machines ]
iptables -X
iptables -P INPUT ACCEPT
iptables -P OUTPUT ACCEPT
iptables -P FORWARD ACCEPT
iptables -nL
Internal versus external detection
You will run nmap from the first machine, targeting the second one, to see port status on the second. First, let the second machine analyze itself. On the second machine please execute:
netstat -pant
[ note: an alternative is ss
-pant . ss is a modern replacement for linux netstat; netstat
remains cross-platform while ss is linux-only ]
Observe which ports are open. Check that by moving over to the first machine executing:
nmap -sT <target-IP>
netstat and nmap are both looking at the second machine. With netstat, the second machine is looking at itself; while with nmap, the first machine is looking at the second from outside. Since we're talking about two views of the very same thing we'd expect both programs to report the same ports, albeit in different format. As you look at them, what's the comparison between the local netstat and remote nmap views?
Change the set of open ports on the second machine, by closing open one(s) and/or opening closed one(s). For instructions to do that, see the box below with heading "Changing the set of open and closed ports." As you alter the profile of open and closed ports, check that nmap and netstat give readings that are 1) accurate, and 2) consistent with each other.
Packet activity of nmap
Now let's look in detail at the operational behavior of nmap. Wireshark will reveal it. Run Wireshark on the second machine (if in a VM configured with a low quantity of memory you may need to increase it). I assume you are familiar with the standard "3-way handshake" by which TCP establishes a fresh conversation with another machine. Client sends a packet with "syn" bit flag set, server sends back a packet with "syn" and "ack" flags set if the port is open, or with "rst" flag if not. To complete the connection, client confirms by sending a packet with "ack" set. Above we used "nmap -sT" which is nmap's TCP connect scan. Read its description in the nmap man page. Now choose one of the ports that is open on the second, target computer. From the first computer run nmap's connect scan against just that port. For example, if that's port 80:
nmap -sT -p 80 <target-IP>
That causes a volley of 4 packets. Identify them in Wireshark and relate them to the 3-way handshake (i.e., examine the flag bits in the tcp headers of these packets).
nmap also has a version called TCP SYN scan, slightly different. Read its description in the nmap man page. Now run it against an open port, for example maybe port 80, if it's open:
nmap -sS -p 80 <target-IP>
This time there are 3 packets (or perhaps, if nmap issues the probe twice, 6). For an open port, how would you describe the difference between the -sT and -sS scan versions in terms of normal TCP operation to start conversations?
Repeat the two above probes from the first machine, but do it against a port known to be closed on the second. For example, supposing 10101 is closed on the second machine:
nmap -sT -p 10101 <target-IP>
nmap -sS -p 10101 <target-IP>
How many packets result from these? For a closed port, is there an operational difference between them? (If nmap operates very slowly it may speed up if you add a "-T4" option.)
You can see that nmap's various scan types involve some minor but deliberate differences in behavior. These are designed to elicit different, known, responsive behavior from the target. Possibly to identify the target operating system. Or to minimize the likelihood of scan detection by the target, should it be running intrusion detection software. Look at the man page again. There are several scan variants you could try. -sN, -sF, -sX, -sA, -sW, -sM. Play with a couple of these a little. Take a look at the packets they generate and the results nmap reports when you run them.
Effect of firewall
Choose one of the open ports, 22 as example assuming it is open. Without closing it, erect a firewall rule that prevents it from being reached. On the second machine:
iptables -A INPUT -p tcp --dport 22 -j DROP [ adds a rule to discard tcp packets with "80" as destination port; they won't get thjrough ]
Run a SYN scan against the second machine from the first:
nmap -sS <target-IP>
Look at the difference in result reported for that port. Now get rid of the rule:
iptables -D INPUT -p tcp --dport 22 -j DROP
then nmap will again be able to get through to port 22.
Operating system "fingerprinting"
Determine the address of one machine running Windows, and another running linux, if you have them in your environment. Perform operating system detection against each:
nmap -O <target-IP>
Did nmap get it right? (Sometimes it can, sometimes not.)
If you are using the provided VMs' normal configuration they will be unable to reach any machines in your environment other than one another. You could change that by joining a VM to your local network (i.e., the one to which your VMs' host machine belongs). That way, if your host is a Windows or Mac machine it brings you something, within reach, whose operating system you can try to fingerprint.
Decoy scan
Run this one:
nmap -sS -p 80 -D 207.192.16.206,66.158.250.44 <target-IP>
Read about decoy scans in the man page. Judging from what you captured in Wireshark when doing this,, the target will experience contact from how many machines? What machines are they??
What to turn in:
Open terminal windows of both machines, simultaneously visible on your desktop. (If doing this exercise using VMs open both on your host's desktop; if using separate physical machines operate on one of them and show the terminal window of the other via an ssh connection to it.)
In the server: run netstat to see open tcp ports.
In the client: run an nmap tcp scan of the server, against ports 1 to 100. This will be the "before" scan.
In the server: additively get two more ports open, port 80 plus any other unused port (i.e., one that didn't appear in the netstat output) in the range from 1 to 100. Any such port is fine, your choice. Again, run netstat to see open tcp ports.
In the client: run an nmap tcp scan of the server, against ports 1 to 100. This will be the "after" scan.
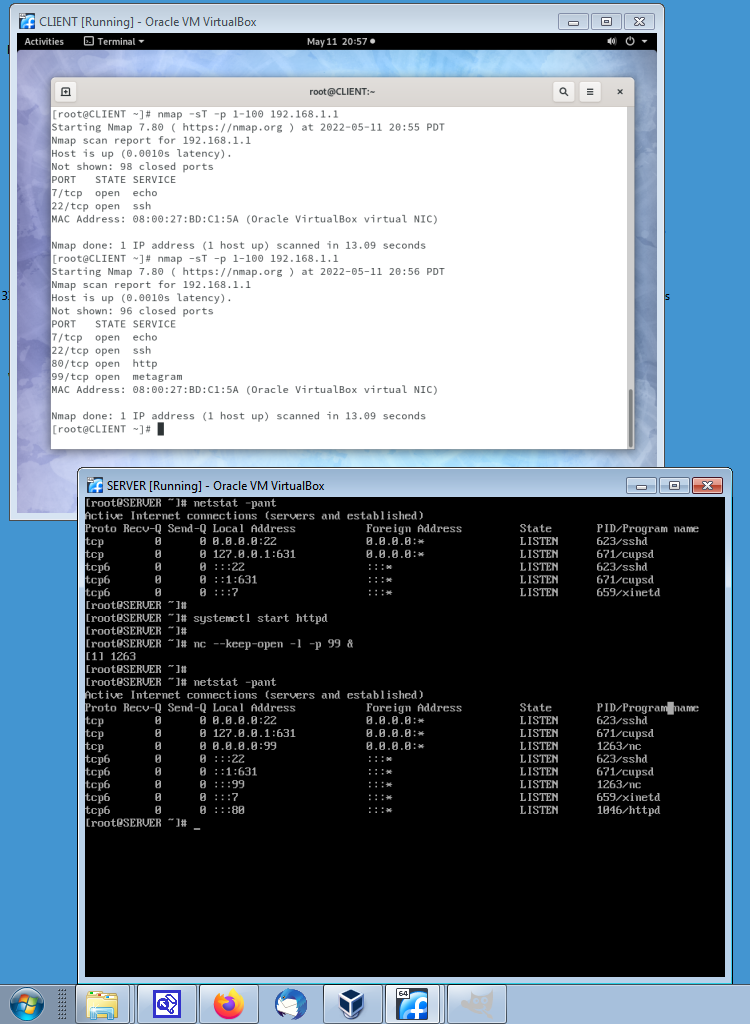
Take a screenshot of that using your host's screenshot software, with both client and server terminals visible and legible. Title the screenshot file "ports.jpg" or "ports.png". Turn that in.
My screenshot looks like this. (Rhetorical: there's one port open on my server that wasn't seen when the client scanned it, number 631. Why did the client miss it? what looks a little different about 631 in netstat?)
|
Changing the set of open and closed ports You do that by stopping or starting programs that use those ports. For example if the ssh server is installed on your machine you could start and stop it as: systemctl start sshd It will use tcp port 22 by default. Or if you have the apache http server: systemctl start httpd It will use tcp port 80 by default. If you want to activate/deactivate some arbitrary tcp port of your choosing: nc --keep-open -l -p 4567 & [ causes nc to
listen on tcp port 4567; it will terminate after a time but --keep-open prevents
that ] Be careful what you kill. Be sure it's not something you're making use of (in particular, don't kill sshd on a machine you're accessing via sshd!). Now repeat the two measurements, netstat from inside and nmap from outside, and confirm that the change is detected and reflected by each. (Any service you stopped should disappear, and any you started should show up.) nmap doesn't test all the 65536 possible port numbers, only the lowest 1000, approximately. If it doesn't report on a port you opened, direct its attention to that particular port explicitly, for example: nmap -sT <target-IP> -p 4567 All of the above deals with tcp ports. Separately, udp also adopts port numbers. Some services use udp by default, network time protocol for example. If it is installed you could start it as: systemctl start ntpd It will use udp port 123 by default. If you want to activate/deactivate an arbitrary udp port of your choosing: nc -u -l -p 4567 & [ causes nc to
open udp port 4567 ] Just as netcat (nc) can activate a udp port if you specify its "-u" option, netstat too has a "-u" option. If you want it to show you the active udp ports: netstat -panu [ if you want to see both tcp and udp ports give options t and u : netstat -pantu ] and nmap has a udp scan: nmap -sU <target-IP> |