
BIND (Berkeley Internet Name Daemon) name server
The exercise to perform
Log in as root. Work with a partner, two machines. The first will configure BIND to serve arbitrary IP addresses in return for arbitrary domain names. The second will designate the first as its name server, ask for one of the arbitrary names, and receive the corresponding address. The first is the "server" and the second the "client."
On the server, make sure BIND is installed:
systemctl status named
If you get a screen message like "not found" then you must install it:
yum install bind
We are going to prepare an absolute barebones (and pragmatically inadequate) configuration. If a default "named.conf" configuration file was installed, preserve it:
mv /etc/named.conf /etc/named.conf.org
Manually configure BIND from provided skeleton config files
Obtain the file dns-exercise.tar per your instructor. Put it in your home directory. It contains two zone files and a BIND configuration file that references them. Create a temporary directory and extract these tar'ed files into it:
cd
mkdir temp-dns
cd temp-dns
tar -xvf ../dns-exercise.tar
ls -l
The files have the content shown below. They are templates or skeletons, containing capitalized words serving as tokens for which you are to provide substitutes that you will choose.
"named.conf":
options {
directory "/var/named";
};
zone "SOMEZONE" IN {
type master;
file "SOMEZONES-FILE";
};
zone "ANOTHERZONE" IN {
type master;
file "ANOTHERZONES-FILE";
};
"SOMEZONES-FILE":
SOMEZONE. IN SOA ns.somewhere.com admin@isp.com ( 1 10800 3600 604800 86400 )
SOMEZONE. IN NS ns.somewhere.com
localhost IN A 127.0.0.1
SOMZONE-NAME1 IN A SOMEZONE-ADDRESS1
SOMZONE-NAME2 IN A SOMEZONE-ADDRESS2
SOMZONE-NAME3 IN A SOMEZONE-ADDRESS3
SOMZONE-NAME4 IN A SOMEZONE-ADDRESS4
"ANOTHERZONES-FILE":
ANOTHERZONE. IN SOA ns.there.com. admin@isp.com ( 1 10800 3600 604800 86400 )
ANOTHERZONE. IN NS ns.there.com.
localhost IN A 127.0.0.1
ANOTHERZONE-NAME1 IN A ANOTHERZONE-ADDRESS1
ANOTHERZONE-NAME2 IN A ANOTHERZONE-ADDRESS2
ANOTHERZONE-NAME3 IN A ANOTHERZONE-ADDRESS3
The 2 zones need names. Choose 2 names for them. The first zone will provide for 4 name-address mappings and the second zone for 3 of them. Choose 1a) a name for the first zone, 1b) 4 name-address pairs for its mappings, 2a) a name for the second zone, and 2b) 3 name-address pairs for its mappings. Pick whatever whatever you want (but avoid names containing spaces or special characters).. Possible examples:
| names for the zones | mappings in the zones | ||||||||
| directions |
|
||||||||
| elements |
|
||||||||
| flavors |
|
||||||||
| meals |
|
Or just roll your own. Make something up that's easy to remember.
Then, edit the files to substitute your particular choices wherever you see capitalized placeholder names in the files. For example, if in the second zone you would like to have a mapping of the name "milkyway" to the address "10.0.0.1" you would edit the line
ANOTHERZONE-NAME1 IN A ANOTHERZONE-ADDRESS1
to become
milkyway IN A 10.0.0.1
Here is a complete example. I want my first zone to
be named "red" and the second to be "blue". I want them to
contain the following mappings:
| names for my zones | mappings in my zones | ||||||||
| red |
|
||||||||
| blue |
|
I want these mappings to become operational in BIND. To accomplish that I simply do appropriate search-and-replace within my provided skeleton files. They end up looking like:
| /etc/named.conf: |
| options { directory "/var/named"; }; zone "red" IN { type master; file "redfile"; }; zone "blue" IN { type master; file "bluefile"; }; |
| /var/named/redfile: | /var/named/bluefile: |
| red. IN SOA ns.somewhere.com
admin@isp.com ( 1 10800 3600 604800 86400 ) red. IN NS ns.somewhere.com localhost IN A 127.0.0.1 mercury IN A 1.1.1.1 venus IN A 2.2.2.2 earth IN A 3.3.3.3 mars IN A 4.4.4.4 |
blue. IN SOA ns.there.com. admin@isp.com ( 1 10800 3600 604800 86400 ) blue. IN NS ns.there.com. localhost IN A 127.0.0.1 lion IN A 192.168.0.1 tiger IN A 192.168.0.2 bear IN A 192.168.0.3 |
I could have done this edit job using an ordinary an interactive editor. In fact, I used sed ("stream editor") which is a command line tool to edit text programatically. I wrote the needed sed commands to make the text replacements and put them in a script. For reference, you can find the script at the bottom of the page. In this exercise you should use an interactive editor if you are comfortable with one. gedit is available and intuitive. But be aware of the sed option for dynamic, in-place search-and-replace and use it if you prefer.
Now, once you've fixed up the files, deploy them:
cp named.conf /etc
cp redfile /var/named
cp bluefile /var/named
and start the BIND dns server:
systemctl start named ( or possibly instead /usr/sbin/named -u named* )
Finally, determine the server's IP address and tell your client partner.
ifconfig eth0 (or whatever is the name of your interface if not "eth0")
On the client, appoint the new name server as the client's. That is, name it in /etc/resolv.conf. That file should contain a line like:
nameserver <IP address of the new dns server>
Now on the client:
dig +short venus.red
should return the address 2.2.2.2, but you use one of the names you chose and verify it returns the address you corresponded with it. And
dig +short tiger.blue
It should return the address 192.168.0.2, but you use one of the names you chose and verify it returns the address you corresponded with it.
To add a real-world dimension, determine the IP address of some fellow student, and enter it together with his name into one of the zones on the server. Restart the server to make the change take effect. Then, have the client ping the student by his name, rather than his machine's IP.
Automate with a graphical tool (webmin)
Install webmin if it is not already on your computer. Go to webmin.com, download and save the rpm file, then execute something like:
rpm -Uvh webmin-1.750.1.noarch.rpm (the embedded version number in the rpm file's name may be different)
Once installed, webmin listens on your computer's ports (both tcp and udp) 10000, by default. You login using "root," using the same password to log in to webmin as you do to log in to the machine, by default. In your graphical browser go to:
https://127.0.0.1:10000
which brings you to your local machine's copy of webmin, able to perform many administration tasks through the browser interface, including maintenance of your dns server (named). Once logged in, make menu choice "Servers" and following that "BIND DNS Server." Observe that the zone(s) you created above are known to webmin, shown under "Existing DNS Zones" at the bottom of the screen:
Click on one of the zones. The resulting screen offers icons allowing you to view and maintain the various record types that a zone file might contain:

The main type of record is the address record. Click on the icon for "Address" records and view the several mappings you created manually above:
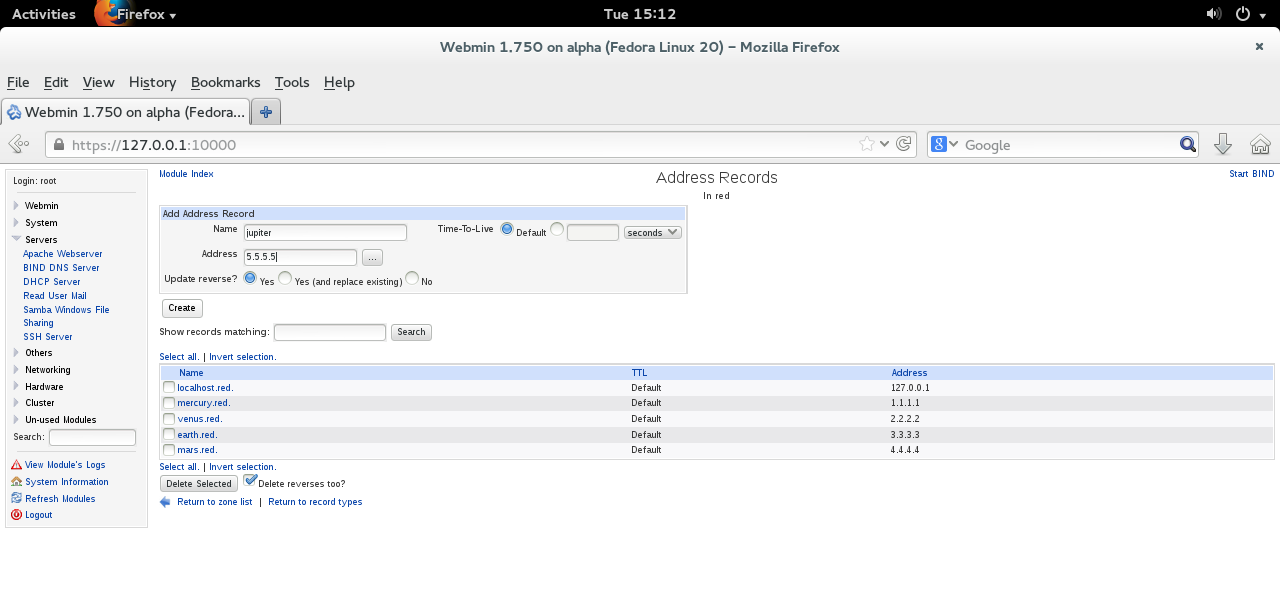
Let webmin add an additional address record/mapping for you. Enter the new mapping's name and address (choose whatever you like) into the "Name" and "Address" text boxes, them press the "Create" button. webmin now shows the additional record. From webmin's menu, Logout.
View the data that webmin inserted into your zone file. Mine, for zone "red" which contained records for mercury, venus, earth, and mars, now contains the new one from webmin for jupiter. The zone file /var/named/redfile looks like this:
red.    IN      SOA     ns.somewhere.com. admin@isp.com (
                        2
                        10800
                        3600
                        604800
                        86400 )
red.    IN      NS      ns.somewhere.com.

localhost IN    A       127.0.0.1
mercury IN      A       1.1.1.1
venus   IN      A       2.2.2.2
earth   IN      A       3.3.3.3
mars    IN      A       4.4.4.4
jupiter.red.    IN      A       5.5.5.5
webmin talks to you via the browser, then talks to configuration files such as dns zone files through backend programmatic editing scripts (in perl). Since it's debugged, a virtue is that it doesn't make typos or other human mistakes. This is particularly useful in maintaining dns config files since they are particularly sensitive to syntax and very easy to mess up.
Note as a detail that the new record does not fully parallel the old ones. We would expect to see:
mercury IN      A       1.1.1.1
venus   IN      A       2.2.2.2
earth   IN      A       3.3.3.3
mars    IN      A       4.4.4.4
jupiter IN      A       5.5.5.5
That's because while the new record is explicit, the old ones are implicit in that it's understood their names are extended by the first token in the SOA record, which here is "red." so that "mars" operationally becomes "mars.red.". webmin chooses not to rely on such features.
Clean up
When finished, to restore the original BIND configuration on the server:
systemctl stop named
cp /etc/named.conf.org /etc/named
rm -f ~/temp-dns/*
rmdir ~/temp-dns
Also delete the zone files you added to /var/named. And on the client remove the line you added to /etc/resolv.conf.
* If "service named bind" gives error messages about not finding the zone files redfile and bluefile, try the alternative direct invocation of named shown. The purpose of calling named directly is to avoid the options with which the "service named bind" script does so. Some versions of Fedora linux have used named's chroot feature, which locates zone files elsewhere. The script invokes this feature. But this exercise locates the zone files in their traditional place. chroot is a good idea (it's a security feature) but one thing at a time and let's keep things tutorially simple. Incidentally, subsequent named versions have instituted other ways to achieve the same security so using chroot with named is now deprecated (2015).
My script using sed to edit the skeleton files, rather than an interactive editor, for reference:
# change names then addresses used for the the mappings in
SOMEZONES-FILE
sed -i s/SOMEZONE-NAME1/mercury/ SOMEZONES-FILE
sed -i s/SOMEZONE-NAME2/venus/ SOMEZONES-FILE
sed -i s/SOMEZONE-NAME3/earth/ SOMEZONES-FILE
sed -i s/SOMEZONE-NAME4/mars/ SOMEZONES-FILE
sed -i s/SOMEZONE-ADDRESS1/1.1.1.1/ SOMEZONES-FILE
sed -i s/SOMEZONE-ADDRESS2/2.2.2.2/ SOMEZONES-FILE
sed -i s/SOMEZONE-ADDRESS3/3.3.3.3/ SOMEZONES-FILE
sed -i s/SOMEZONE-ADDRESS4/4.4.4.4/ SOMEZONES-FILE
# change the name used for the zone in the SOMEZONES-FILE
sed -i s/SOMEZONE/red/ SOMEZONES-FILE
# change names then addresses used for the mappings in ANOTHERZONES-FILE
sed -i s/ANOTHERZONE-NAME1/lion/ ANOTHERZONES-FILE
sed -i s/ANOTHERZONE-NAME2/tiger/ ANOTHERZONES-FILE
sed -i s/ANOTHERZONE-NAME3/bear/ ANOTHERZONES-FILE
sed -i s/ANOTHERZONE-ADDRESS1/192.168.0.1/ ANOTHERZONES-FILE
sed -i s/ANOTHERZONE-ADDRESS2/192.168.0.2/ ANOTHERZONES-FILE
sed -i s/ANOTHERZONE-ADDRESS3/192.168.0.3/ ANOTHERZONES-FILE
# change the name used for the zone in the ANOTHERZONES-FILE
sed -i s/ANOTHERZONE/blue/ ANOTHERZONES-FILE
# change the names used for the zone files in named.conf
sed -i s/SOMEZONES-FILE/redfile/ named.conf
sed -i s/ANOTHERZONES-FILE/bluefile/ named.conf
# change the names used for the zones in named.conf
sed -i s/SOMEZONE/red/ named.conf
sed -i s/ANOTHERZONE/blue/ named.conf
# rename zone files to agree with the names used for them in named.conf
mv SOMEZONES-FILE redfile
mv ANOTHERZONES-FILE bluefile